DIRECTIONS FOR TAKING SOIL SAMPLES
USING THE PRESCRIPTION SOIL ANALYSIS WEBSITE [Please read through these directions entirely before beginning]
STEP 1: Refer to the Instructions specifically for logging in, setting up customers, and initiating soil tests through the website.
STEP 2: If possible, print the bag label and affix it to the collection bag prior to filling it with soil [Notice the ‘Fill Line’ mark]
STEP 3: A soil probe works best, but a small garden trowel can also be used.
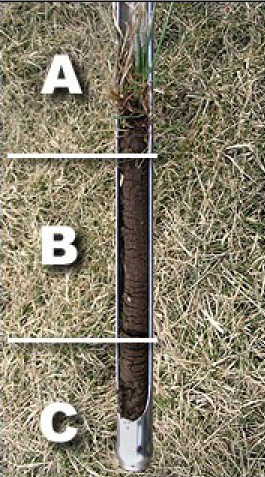
STEP 4: Push the soil probe straight into the soil using a slight twisting motion and downward pressure [Do not use excessive pressure or ‘bang’ the probe]. Measure how deep it went into the soil, using the smallest number measured.“Core Depth” provides an indication of the level of soil compaction and is a very important factor.
STEP 5: Examine the core of soil in the probe and measure the plant debris (grass, roots, clippings, blades) sitting above the soil line. This is commonly called “Thatch,” and provides an indication of your soil’s biological activity level. Enter the largest measurement in the “Thatch Layer” line. If the test is for the tree(s) or ornamentals measure the “Thatch” within the canopy or root zone.
STEP 6: Starting at the bottom of the soil core, gently remove the soil while looking for main turf roots. They are typically larger and lighter in color (white) than the fine root hairs which are more numerous. Enter the shortest length of the main root(s) in the data form.
STEP 7: Discard the ‘Thatch Layer” and place only the soil in a can or small pail. Repeat Steps #4, #5 #6 and #7 randomly throughout the test area(s) 10-12 times. Mix the soil cores together in the can/pail and place enough soil in the bag to reach the ‘“Soil Fill Line” or 1 cup. Seal the bag tightly so no soil will ‘leak’ during shipment. DO NOT collect soil from areas between streets-curbs-walks; adjacent to paved areas or foundations; or in areas where excessive water flows and/or collects such as down-spouts, swales, or low-lying areas.
USE the smallest/lowest measurements obtained for “Core Depth” and “Main Root Length” and the largest measurement for “Thatch Layer.” This will help ensure that the recommendations will be effective for the entire test area(s).
STEP 8: When entering the collected data into the electronic form, different fields are active for different test types. The more data provided the more accurate and helpful will be the recommendations.
STEP 9: If testing for trees, shrubs, groundcovers, fruits-nuts, vegetables, or crops, you must enter at least one species (i.e. maple, azalea, apple, oats, etc.). If the specific variety is known then the recommendations can be even more focused and helpful. Additional recommendations can be provided for other species if using the same soil for a small fee.
For a further explanation call Keith ~ (800) 645-6464
STEP 10: Place the sealed collection bag(s) in a box and mail/ship to:
Prescription Soil Analysis Lab ~ 902 13th Street N. ~ PO Box 187 ~ Benson, MN 56215 (Our system can print the shipping label and USPS Flat Rate boxes work well.)
STEP 11: After entering the collected data into the collection form on the website for each sample, add each sample to the ‘Cart’, complete the ‘Check-out’ procedure and update each sample as ‘Shipped’ including the date.
The lab results and recommendations will be emailed to you as soon as they are completed. The FAQ tab has more information and for other questions ~ Call Keith (800) 645-6464